z303729470
- 浏览: 129295 次
- 性别:

- 来自: 北京
-

最新评论
-
qiuhuahui1:
真的有用,帮我节省了大把的时间。
android的ant编译打包 -
fxiaozj:
楼主,有没有demo?
Android ViewGroup实现页面滑动效果并实现不同的动画效果 -
sgjsdf5944:
你好,请问下楼主如果我想在安装完成页面上控制打开不可用该怎么实 ...
Android 监控程序安装和删除的实现 -
renfujiang:
养成好习惯,看过别人的文章 就得评论 增加点人气 好文章 我是 ...
android的ant编译打包 -
leishengwei:
你好,第一种方法在4.0时,输入法是弹不出去了,但是光标不能正 ...
Android如何关闭EditText中的软键盘
我们看到很多Android应用都具有自动更新功能,用户一键就可以完成软件的升级更新。得益于Android系统的软件包管理和安装机制,这一功能实现起来相当简单,下面我们就来实践一下。首先给出界面效果
1. 准备知识
在AndroidManifest.xml里定义了每个Android apk的版本标识:
view plaincopy to clipboardprint?<manifest xmlns:android="http://schemas.android.com/apk/res/android"
package="com.myapp"
android:versionCode="1"
android:versionName="1.0.0">
<application></application>
</manifest>
<manifest xmlns:android="http://schemas.android.com/apk/res/android"
package="com.myapp"
android:versionCode="1"
android:versionName="1.0.0">
<application></application>
</manifest>
其中,android:versionCode和android:versionName两个字段分别表示版本代码,版本名称。versionCode是整型数字,versionName是字符串。由于version是给用户看的,不太容易比较大小,升级检查时,可以以检查versionCode为主,方便比较出版本的前后大小。
那么,在应用中如何读取AndroidManifest.xml中的versionCode和versionName呢?可以使用PackageManager的API,参考以下代码:
view plaincopy to clipboardprint?public static int getVerCode(Context context) {
int verCode = -1;
try {
verCode = context.getPackageManager().getPackageInfo(
"com.myapp", 0).versionCode;
} catch (NameNotFoundException e) {
Log.e(TAG, e.getMessage());
}
return verCode;
}
public static String getVerName(Context context) {
String verName = "";
try {
verName = context.getPackageManager().getPackageInfo(
"com.myapp", 0).versionName;
} catch (NameNotFoundException e) {
Log.e(TAG, e.getMessage());
}
return verName;
}
public static int getVerCode(Context context) {
int verCode = -1;
try {
verCode = context.getPackageManager().getPackageInfo(
"com.myapp", 0).versionCode;
} catch (NameNotFoundException e) {
Log.e(TAG, e.getMessage());
}
return verCode;
}
public static String getVerName(Context context) {
String verName = "";
try {
verName = context.getPackageManager().getPackageInfo(
"com.myapp", 0).versionName;
} catch (NameNotFoundException e) {
Log.e(TAG, e.getMessage());
}
return verName;
}
或者在AndroidManifest中将android:versionName="1.2.0"写成android:versionName="@string/app_versionName",然后在values/strings.xml中添加对应字符串,这样实现之后,就可以使用如下代码获得版本名称:
view plaincopy to clipboardprint?public static String getVerName(Context context) {
String verName = context.getResources()
.getText(R.string.app_versionName).toString();
return verName;
}
public static String getVerName(Context context) {
String verName = context.getResources()
.getText(R.string.app_versionName).toString();
return verName;
}
同理,apk的应用名称可以这样获得:
view plaincopy to clipboardprint?public static String getAppName(Context context) {
String verName = context.getResources()
.getText(R.string.app_name).toString();
return verName;
}
public static String getAppName(Context context) {
String verName = context.getResources()
.getText(R.string.app_name).toString();
return verName;
}
2. 流程框架

3. 版本检查
在服务端放置最新版本的apk文件,如:http://localhost/myapp/myapp.apk
同时,在服务端放置对应此apk的版本信息调用接口或者文件,如:http://localhost/myapp/ver.json
ver.json中的内容为:
view plaincopy to clipboardprint?[{"appname":"jtapp12","apkname":"jtapp-12-updateapksamples.apk","verName":1.0.1,"verCode":2}]
[{"appname":"jtapp12","apkname":"jtapp-12-updateapksamples.apk","verName":1.0.1,"verCode":2}]
然后,在手机客户端上进行版本读取和检查:
view plaincopy to clipboardprint?private boolean getServerVer () {
try {
String verjson = NetworkTool.getContent(Config.UPDATE_SERVER
+ Config.UPDATE_VERJSON);
JSONArray array = new JSONArray(verjson);
if (array.length() > 0) {
JSONObject obj = array.getJSONObject(0);
try {
newVerCode = Integer.parseInt(obj.getString("verCode"));
newVerName = obj.getString("verName");
} catch (Exception e) {
newVerCode = -1;
newVerName = "";
return false;
}
}
} catch (Exception e) {
Log.e(TAG, e.getMessage());
return false;
}
return true;
}
private boolean getServerVer () {
try {
String verjson = NetworkTool.getContent(Config.UPDATE_SERVER
+ Config.UPDATE_VERJSON);
JSONArray array = new JSONArray(verjson);
if (array.length() > 0) {
JSONObject obj = array.getJSONObject(0);
try {
newVerCode = Integer.parseInt(obj.getString("verCode"));
newVerName = obj.getString("verName");
} catch (Exception e) {
newVerCode = -1;
newVerName = "";
return false;
}
}
} catch (Exception e) {
Log.e(TAG, e.getMessage());
return false;
}
return true;
}
比较服务器和客户端的版本,并进行更新操作。
view plaincopy to clipboardprint?if (getServerVerCode()) {
int vercode = Config.getVerCode(this); // 用到前面第一节写的方法
if (newVerCode > vercode) {
doNewVersionUpdate(); // 更新新版本
} else {
notNewVersionShow(); // 提示当前为最新版本
}
}
if (getServerVerCode()) {
int vercode = Config.getVerCode(this); // 用到前面第一节写的方法
if (newVerCode > vercode) {
doNewVersionUpdate(); // 更新新版本
} else {
notNewVersionShow(); // 提示当前为最新版本
}
}
详细方法:
view plaincopy to clipboardprint?private void notNewVersionShow() {
int verCode = Config.getVerCode(this);
String verName = Config.getVerName(this);
StringBuffer sb = new StringBuffer();
sb.append("当前版本:");
sb.append(verName);
sb.append(" Code:");
sb.append(verCode);
sb.append(",/n已是最新版,无需更新!");
Dialog dialog = new AlertDialog.Builder(Update.this).setTitle("软件更新")
.setMessage(sb.toString())// 设置内容
.setPositiveButton("确定",// 设置确定按钮
new DialogInterface.OnClickListener() {
@Override
public void onClick(DialogInterface dialog,
int which) {
finish();
}
}).create();// 创建
// 显示对话框
dialog.show();
}
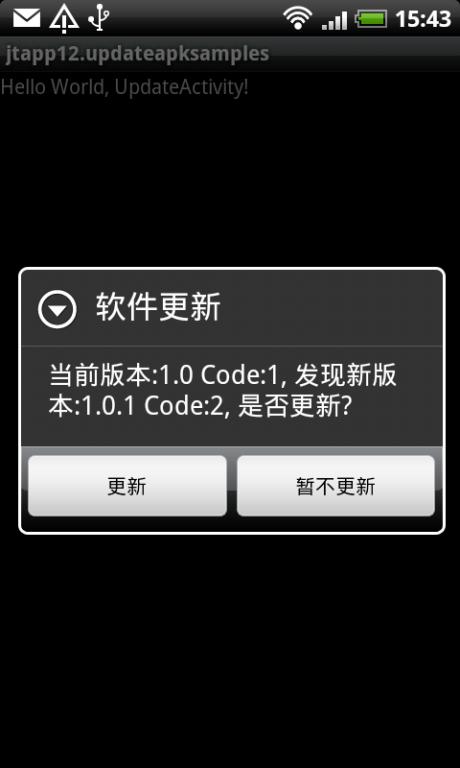
private void doNewVersionUpdate() {
int verCode = Config.getVerCode(this);
String verName = Config.getVerName(this);
StringBuffer sb = new StringBuffer();
sb.append("当前版本:");
sb.append(verName);
sb.append(" Code:");
sb.append(verCode);
sb.append(", 发现新版本:");
sb.append(newVerName);
sb.append(" Code:");
sb.append(newVerCode);
sb.append(", 是否更新?");
Dialog dialog = new AlertDialog.Builder(Update.this)
.setTitle("软件更新")
.setMessage(sb.toString())
// 设置内容
.setPositiveButton("更新",// 设置确定按钮
new DialogInterface.OnClickListener() {
@Override
public void onClick(DialogInterface dialog,
int which) {
pBar = new ProgressDialog(Update.this);
pBar.setTitle("正在下载");
pBar.setMessage("请稍候...");
pBar.setProgressStyle(ProgressDialog.STYLE_SPINNER);
downFile(Config.UPDATE_SERVER + Config.UPDATE_APKNAME);
}
})
.setNegativeButton("暂不更新",
new DialogInterface.OnClickListener() {
public void onClick(DialogInterface dialog,
int whichButton) {
// 点击"取消"按钮之后退出程序
finish();
}
}).create();// 创建
// 显示对话框
dialog.show();
}
private void notNewVersionShow() {
int verCode = Config.getVerCode(this);
String verName = Config.getVerName(this);
StringBuffer sb = new StringBuffer();
sb.append("当前版本:");
sb.append(verName);
sb.append(" Code:");
sb.append(verCode);
sb.append(",/n已是最新版,无需更新!");
Dialog dialog = new AlertDialog.Builder(Update.this).setTitle("软件更新")
.setMessage(sb.toString())// 设置内容
.setPositiveButton("确定",// 设置确定按钮
new DialogInterface.OnClickListener() {
@Override
public void onClick(DialogInterface dialog,
int which) {
finish();
}
}).create();// 创建
// 显示对话框
dialog.show();
}
private void doNewVersionUpdate() {
int verCode = Config.getVerCode(this);
String verName = Config.getVerName(this);
StringBuffer sb = new StringBuffer();
sb.append("当前版本:");
sb.append(verName);
sb.append(" Code:");
sb.append(verCode);
sb.append(", 发现新版本:");
sb.append(newVerName);
sb.append(" Code:");
sb.append(newVerCode);
sb.append(", 是否更新?");
Dialog dialog = new AlertDialog.Builder(Update.this)
.setTitle("软件更新")
.setMessage(sb.toString())
// 设置内容
.setPositiveButton("更新",// 设置确定按钮
new DialogInterface.OnClickListener() {
@Override
public void onClick(DialogInterface dialog,
int which) {
pBar = new ProgressDialog(Update.this);
pBar.setTitle("正在下载");
pBar.setMessage("请稍候...");
pBar.setProgressStyle(ProgressDialog.STYLE_SPINNER);
downFile(Config.UPDATE_SERVER + Config.UPDATE_APKNAME);
}
})
.setNegativeButton("暂不更新",
new DialogInterface.OnClickListener() {
public void onClick(DialogInterface dialog,
int whichButton) {
// 点击"取消"按钮之后退出程序
finish();
}
}).create();// 创建
// 显示对话框
dialog.show();
}
4. 下载模块
注,本部分参考了前人的相关实现,见 http://apps.hi.baidu.com/share/detail/24172508
view plaincopy to clipboardprint?void downFile(final String url) {
pBar.show();
new Thread() {
public void run() {
HttpClient client = new DefaultHttpClient();
HttpGet get = new HttpGet(url);
HttpResponse response;
try {
response = client.execute(get);
HttpEntity entity = response.getEntity();
long length = entity.getContentLength();
InputStream is = entity.getContent();
FileOutputStream fileOutputStream = null;
if (is != null) {
File file = new File(
Environment.getExternalStorageDirectory(),
Config.UPDATE_SAVENAME);
fileOutputStream = new FileOutputStream(file);
byte[] buf = new byte[1024];
int ch = -1;
int count = 0;
while ((ch = is.read(buf)) != -1) {
fileOutputStream.write(buf, 0, ch);
count += ch;
if (length > 0) {
}
}
}
fileOutputStream.flush();
if (fileOutputStream != null) {
fileOutputStream.close();
}
down();
} catch (ClientProtocolException e) {
e.printStackTrace();
} catch (IOException e) {
e.printStackTrace();
}
}
}.start();
}
void downFile(final String url) {
pBar.show();
new Thread() {
public void run() {
HttpClient client = new DefaultHttpClient();
HttpGet get = new HttpGet(url);
HttpResponse response;
try {
response = client.execute(get);
HttpEntity entity = response.getEntity();
long length = entity.getContentLength();
InputStream is = entity.getContent();
FileOutputStream fileOutputStream = null;
if (is != null) {
File file = new File(
Environment.getExternalStorageDirectory(),
Config.UPDATE_SAVENAME);
fileOutputStream = new FileOutputStream(file);
byte[] buf = new byte[1024];
int ch = -1;
int count = 0;
while ((ch = is.read(buf)) != -1) {
fileOutputStream.write(buf, 0, ch);
count += ch;
if (length > 0) {
}
}
}
fileOutputStream.flush();
if (fileOutputStream != null) {
fileOutputStream.close();
}
down();
} catch (ClientProtocolException e) {
e.printStackTrace();
} catch (IOException e) {
e.printStackTrace();
}
}
}.start();
}
下载完成,通过handler通知主ui线程将下载对话框取消。
view plaincopy to clipboardprint?void down() {
handler.post(new Runnable() {
public void run() {
pBar.cancel();
update();
}
});
}
void down() {
handler.post(new Runnable() {
public void run() {
pBar.cancel();
update();
}
});
}
5. 安装应用
view plaincopy to clipboardprint?void update() {
Intent intent = new Intent(Intent.ACTION_VIEW);
intent.setDataAndType(Uri.fromFile(new File(Environment
.getExternalStorageDirectory(), Config.UPDATE_SAVENAME)),
"application/vnd.android.package-archive");
startActivity(intent);
}
void update() {
Intent intent = new Intent(Intent.ACTION_VIEW);
intent.setDataAndType(Uri.fromFile(new File(Environment
.getExternalStorageDirectory(), Config.UPDATE_SAVENAME)),
"application/vnd.android.package-archive");
startActivity(intent);
}
如果你将apk应用发布到market上,那么,你会发现market内建了类似的模块,可以自动更新或者提醒你是否更新应用。那么,对于你自己的应用需要自动更新的话,自己内建一个是不是更加方便了呢?本文提到的代码大多是在UpdateActivity.java中实现,为了能够使更新过程更加友好,可以在最初launcher的Activity中建立一个线程,用来检查服务端是否有更新。有更新的时候就启动UpdateActivity,这样的使用体验更加平滑。
本文例程源码查看/下载:
http://code.google.com/p/androidex/source/browse/trunk/jtapp-12-updateapksamples
版权归个人所有,转载请注明出处
http://blog.csdn.net/xjanker2/archive/2011/04/06/6303937.aspx
1. 准备知识
在AndroidManifest.xml里定义了每个Android apk的版本标识:
view plaincopy to clipboardprint?<manifest xmlns:android="http://schemas.android.com/apk/res/android"
package="com.myapp"
android:versionCode="1"
android:versionName="1.0.0">
<application></application>
</manifest>
<manifest xmlns:android="http://schemas.android.com/apk/res/android"
package="com.myapp"
android:versionCode="1"
android:versionName="1.0.0">
<application></application>
</manifest>
其中,android:versionCode和android:versionName两个字段分别表示版本代码,版本名称。versionCode是整型数字,versionName是字符串。由于version是给用户看的,不太容易比较大小,升级检查时,可以以检查versionCode为主,方便比较出版本的前后大小。
那么,在应用中如何读取AndroidManifest.xml中的versionCode和versionName呢?可以使用PackageManager的API,参考以下代码:
view plaincopy to clipboardprint?public static int getVerCode(Context context) {
int verCode = -1;
try {
verCode = context.getPackageManager().getPackageInfo(
"com.myapp", 0).versionCode;
} catch (NameNotFoundException e) {
Log.e(TAG, e.getMessage());
}
return verCode;
}
public static String getVerName(Context context) {
String verName = "";
try {
verName = context.getPackageManager().getPackageInfo(
"com.myapp", 0).versionName;
} catch (NameNotFoundException e) {
Log.e(TAG, e.getMessage());
}
return verName;
}
public static int getVerCode(Context context) {
int verCode = -1;
try {
verCode = context.getPackageManager().getPackageInfo(
"com.myapp", 0).versionCode;
} catch (NameNotFoundException e) {
Log.e(TAG, e.getMessage());
}
return verCode;
}
public static String getVerName(Context context) {
String verName = "";
try {
verName = context.getPackageManager().getPackageInfo(
"com.myapp", 0).versionName;
} catch (NameNotFoundException e) {
Log.e(TAG, e.getMessage());
}
return verName;
}
或者在AndroidManifest中将android:versionName="1.2.0"写成android:versionName="@string/app_versionName",然后在values/strings.xml中添加对应字符串,这样实现之后,就可以使用如下代码获得版本名称:
view plaincopy to clipboardprint?public static String getVerName(Context context) {
String verName = context.getResources()
.getText(R.string.app_versionName).toString();
return verName;
}
public static String getVerName(Context context) {
String verName = context.getResources()
.getText(R.string.app_versionName).toString();
return verName;
}
同理,apk的应用名称可以这样获得:
view plaincopy to clipboardprint?public static String getAppName(Context context) {
String verName = context.getResources()
.getText(R.string.app_name).toString();
return verName;
}
public static String getAppName(Context context) {
String verName = context.getResources()
.getText(R.string.app_name).toString();
return verName;
}
2. 流程框架
3. 版本检查
在服务端放置最新版本的apk文件,如:http://localhost/myapp/myapp.apk
同时,在服务端放置对应此apk的版本信息调用接口或者文件,如:http://localhost/myapp/ver.json
ver.json中的内容为:
view plaincopy to clipboardprint?[{"appname":"jtapp12","apkname":"jtapp-12-updateapksamples.apk","verName":1.0.1,"verCode":2}]
[{"appname":"jtapp12","apkname":"jtapp-12-updateapksamples.apk","verName":1.0.1,"verCode":2}]
然后,在手机客户端上进行版本读取和检查:
view plaincopy to clipboardprint?private boolean getServerVer () {
try {
String verjson = NetworkTool.getContent(Config.UPDATE_SERVER
+ Config.UPDATE_VERJSON);
JSONArray array = new JSONArray(verjson);
if (array.length() > 0) {
JSONObject obj = array.getJSONObject(0);
try {
newVerCode = Integer.parseInt(obj.getString("verCode"));
newVerName = obj.getString("verName");
} catch (Exception e) {
newVerCode = -1;
newVerName = "";
return false;
}
}
} catch (Exception e) {
Log.e(TAG, e.getMessage());
return false;
}
return true;
}
private boolean getServerVer () {
try {
String verjson = NetworkTool.getContent(Config.UPDATE_SERVER
+ Config.UPDATE_VERJSON);
JSONArray array = new JSONArray(verjson);
if (array.length() > 0) {
JSONObject obj = array.getJSONObject(0);
try {
newVerCode = Integer.parseInt(obj.getString("verCode"));
newVerName = obj.getString("verName");
} catch (Exception e) {
newVerCode = -1;
newVerName = "";
return false;
}
}
} catch (Exception e) {
Log.e(TAG, e.getMessage());
return false;
}
return true;
}
比较服务器和客户端的版本,并进行更新操作。
view plaincopy to clipboardprint?if (getServerVerCode()) {
int vercode = Config.getVerCode(this); // 用到前面第一节写的方法
if (newVerCode > vercode) {
doNewVersionUpdate(); // 更新新版本
} else {
notNewVersionShow(); // 提示当前为最新版本
}
}
if (getServerVerCode()) {
int vercode = Config.getVerCode(this); // 用到前面第一节写的方法
if (newVerCode > vercode) {
doNewVersionUpdate(); // 更新新版本
} else {
notNewVersionShow(); // 提示当前为最新版本
}
}
详细方法:
view plaincopy to clipboardprint?private void notNewVersionShow() {
int verCode = Config.getVerCode(this);
String verName = Config.getVerName(this);
StringBuffer sb = new StringBuffer();
sb.append("当前版本:");
sb.append(verName);
sb.append(" Code:");
sb.append(verCode);
sb.append(",/n已是最新版,无需更新!");
Dialog dialog = new AlertDialog.Builder(Update.this).setTitle("软件更新")
.setMessage(sb.toString())// 设置内容
.setPositiveButton("确定",// 设置确定按钮
new DialogInterface.OnClickListener() {
@Override
public void onClick(DialogInterface dialog,
int which) {
finish();
}
}).create();// 创建
// 显示对话框
dialog.show();
}
private void doNewVersionUpdate() {
int verCode = Config.getVerCode(this);
String verName = Config.getVerName(this);
StringBuffer sb = new StringBuffer();
sb.append("当前版本:");
sb.append(verName);
sb.append(" Code:");
sb.append(verCode);
sb.append(", 发现新版本:");
sb.append(newVerName);
sb.append(" Code:");
sb.append(newVerCode);
sb.append(", 是否更新?");
Dialog dialog = new AlertDialog.Builder(Update.this)
.setTitle("软件更新")
.setMessage(sb.toString())
// 设置内容
.setPositiveButton("更新",// 设置确定按钮
new DialogInterface.OnClickListener() {
@Override
public void onClick(DialogInterface dialog,
int which) {
pBar = new ProgressDialog(Update.this);
pBar.setTitle("正在下载");
pBar.setMessage("请稍候...");
pBar.setProgressStyle(ProgressDialog.STYLE_SPINNER);
downFile(Config.UPDATE_SERVER + Config.UPDATE_APKNAME);
}
})
.setNegativeButton("暂不更新",
new DialogInterface.OnClickListener() {
public void onClick(DialogInterface dialog,
int whichButton) {
// 点击"取消"按钮之后退出程序
finish();
}
}).create();// 创建
// 显示对话框
dialog.show();
}
private void notNewVersionShow() {
int verCode = Config.getVerCode(this);
String verName = Config.getVerName(this);
StringBuffer sb = new StringBuffer();
sb.append("当前版本:");
sb.append(verName);
sb.append(" Code:");
sb.append(verCode);
sb.append(",/n已是最新版,无需更新!");
Dialog dialog = new AlertDialog.Builder(Update.this).setTitle("软件更新")
.setMessage(sb.toString())// 设置内容
.setPositiveButton("确定",// 设置确定按钮
new DialogInterface.OnClickListener() {
@Override
public void onClick(DialogInterface dialog,
int which) {
finish();
}
}).create();// 创建
// 显示对话框
dialog.show();
}
private void doNewVersionUpdate() {
int verCode = Config.getVerCode(this);
String verName = Config.getVerName(this);
StringBuffer sb = new StringBuffer();
sb.append("当前版本:");
sb.append(verName);
sb.append(" Code:");
sb.append(verCode);
sb.append(", 发现新版本:");
sb.append(newVerName);
sb.append(" Code:");
sb.append(newVerCode);
sb.append(", 是否更新?");
Dialog dialog = new AlertDialog.Builder(Update.this)
.setTitle("软件更新")
.setMessage(sb.toString())
// 设置内容
.setPositiveButton("更新",// 设置确定按钮
new DialogInterface.OnClickListener() {
@Override
public void onClick(DialogInterface dialog,
int which) {
pBar = new ProgressDialog(Update.this);
pBar.setTitle("正在下载");
pBar.setMessage("请稍候...");
pBar.setProgressStyle(ProgressDialog.STYLE_SPINNER);
downFile(Config.UPDATE_SERVER + Config.UPDATE_APKNAME);
}
})
.setNegativeButton("暂不更新",
new DialogInterface.OnClickListener() {
public void onClick(DialogInterface dialog,
int whichButton) {
// 点击"取消"按钮之后退出程序
finish();
}
}).create();// 创建
// 显示对话框
dialog.show();
}
4. 下载模块
注,本部分参考了前人的相关实现,见 http://apps.hi.baidu.com/share/detail/24172508
view plaincopy to clipboardprint?void downFile(final String url) {
pBar.show();
new Thread() {
public void run() {
HttpClient client = new DefaultHttpClient();
HttpGet get = new HttpGet(url);
HttpResponse response;
try {
response = client.execute(get);
HttpEntity entity = response.getEntity();
long length = entity.getContentLength();
InputStream is = entity.getContent();
FileOutputStream fileOutputStream = null;
if (is != null) {
File file = new File(
Environment.getExternalStorageDirectory(),
Config.UPDATE_SAVENAME);
fileOutputStream = new FileOutputStream(file);
byte[] buf = new byte[1024];
int ch = -1;
int count = 0;
while ((ch = is.read(buf)) != -1) {
fileOutputStream.write(buf, 0, ch);
count += ch;
if (length > 0) {
}
}
}
fileOutputStream.flush();
if (fileOutputStream != null) {
fileOutputStream.close();
}
down();
} catch (ClientProtocolException e) {
e.printStackTrace();
} catch (IOException e) {
e.printStackTrace();
}
}
}.start();
}
void downFile(final String url) {
pBar.show();
new Thread() {
public void run() {
HttpClient client = new DefaultHttpClient();
HttpGet get = new HttpGet(url);
HttpResponse response;
try {
response = client.execute(get);
HttpEntity entity = response.getEntity();
long length = entity.getContentLength();
InputStream is = entity.getContent();
FileOutputStream fileOutputStream = null;
if (is != null) {
File file = new File(
Environment.getExternalStorageDirectory(),
Config.UPDATE_SAVENAME);
fileOutputStream = new FileOutputStream(file);
byte[] buf = new byte[1024];
int ch = -1;
int count = 0;
while ((ch = is.read(buf)) != -1) {
fileOutputStream.write(buf, 0, ch);
count += ch;
if (length > 0) {
}
}
}
fileOutputStream.flush();
if (fileOutputStream != null) {
fileOutputStream.close();
}
down();
} catch (ClientProtocolException e) {
e.printStackTrace();
} catch (IOException e) {
e.printStackTrace();
}
}
}.start();
}
下载完成,通过handler通知主ui线程将下载对话框取消。
view plaincopy to clipboardprint?void down() {
handler.post(new Runnable() {
public void run() {
pBar.cancel();
update();
}
});
}
void down() {
handler.post(new Runnable() {
public void run() {
pBar.cancel();
update();
}
});
}
5. 安装应用
view plaincopy to clipboardprint?void update() {
Intent intent = new Intent(Intent.ACTION_VIEW);
intent.setDataAndType(Uri.fromFile(new File(Environment
.getExternalStorageDirectory(), Config.UPDATE_SAVENAME)),
"application/vnd.android.package-archive");
startActivity(intent);
}
void update() {
Intent intent = new Intent(Intent.ACTION_VIEW);
intent.setDataAndType(Uri.fromFile(new File(Environment
.getExternalStorageDirectory(), Config.UPDATE_SAVENAME)),
"application/vnd.android.package-archive");
startActivity(intent);
}
如果你将apk应用发布到market上,那么,你会发现market内建了类似的模块,可以自动更新或者提醒你是否更新应用。那么,对于你自己的应用需要自动更新的话,自己内建一个是不是更加方便了呢?本文提到的代码大多是在UpdateActivity.java中实现,为了能够使更新过程更加友好,可以在最初launcher的Activity中建立一个线程,用来检查服务端是否有更新。有更新的时候就启动UpdateActivity,这样的使用体验更加平滑。
本文例程源码查看/下载:
http://code.google.com/p/androidex/source/browse/trunk/jtapp-12-updateapksamples
版权归个人所有,转载请注明出处
http://blog.csdn.net/xjanker2/archive/2011/04/06/6303937.aspx
分享到:


发表评论

-
ListView与Button、imageButton 的共存问题解决
2013-02-20 11:39 1308ListView与Button、imageButton 的共存 ... -
android实现popupwindow的动画效果
2013-02-01 18:56 1994问题:在打开或者关闭popupwindow的时候怎么样显示动画 ... -
Android开发ViewPager中ListView失效问题解决方法
2013-01-28 22:12 2755最近开发一个Android小应用。就是利用ViewPager实 ... -
Android ViewGroup实现页面滑动效果并实现不同的动画效果
2012-08-28 22:24 3122这应该是自己第一次开始写博客,今天起想要记录下自己工作上学到的 ... -
关于WebView的loadData方法以及乱码问题
2012-08-09 14:37 956WebView是Android应用开发� ... -
Android对图片的压缩读取和保存
2012-08-08 10:27 1375在开发图片浏览器等软件是,很多时候要显示图片的缩略图,而一般情 ... -
ubuntu下载android源代码
2012-07-22 00:50 1901用虚拟机来创建一个Ubun ... -
android面试(2)
2012-07-20 16:17 1068附带答案,共100分 一、选择题(30题,每题1.5分,共4 ... -
自定义PreferenceActivity——修改Preference样式、加顶部布局
2012-05-27 20:19 2686首先在res/xml文件夹下建立preferences.xml ... -
android拦截短信并屏蔽系统的Notification
2012-05-21 09:25 1785Android短信拦截,总的来说有两种方式: (一)、在代码 ... -
Android设置应用程序默认语言
2012-05-19 21:03 1521Android应用程序的国际化还是做得不错的,通过设置资源文件 ... -
(android 实战总结)android对html支持接口总结
2012-04-18 09:50 2374Android支持html 的两个接口 1 Spanned ... -
Android的TextView使用Html来处理图片显示、字体样式、超链接等
2012-04-16 11:09 1553转eoe:http://www.eoeandroid.com/ ... -
android的ant编译打包
2012-04-11 14:52 3905Android本身是支持ant打包项目的,并且SDK中自带一个 ... -
使用InputStreamEntity 边读取边上传文件
2012-04-09 17:32 7424HttpClient httpclient = new Def ... -
android xliff字符串操作
2012-04-09 14:59 1411参考:http://blog.csdn.net/freshma ... -
Android:只读EditText内容可滚动(禁止输入法)的实现
2012-04-06 12:00 1393实验设备为HTC hero (SDK 2.1-update1) ... -
Eclipse报内存溢出
2012-04-04 10:50 1098(1)在配置tomcat的JDK里面设置。Window--&g ... -
Android解压缩zip的实现
2012-03-20 11:21 2824android 解压缩zip包,需要在menifest.xml ... -
Android alertdialog的按钮点击后不消失
2012-03-15 20:35 1860使用反射: 在你的setPositiveButton中添加 ...
相关推荐
转帖:Android应用的自动升级、更新模块的实现docx.docx
NULL 博文链接:https://daixj110.iteye.com/blog/1133158
本文给大家分享Android里应用版本更新功能这一块的实现。 一个好的应用软件都是需要好的维护,从初出版本到最后精品,这个过程需要版本不停的更新,那么如何让用户第一时间获取最新的应用安装包呢?那么就要求我们从...
Fir.im通道APK更新器,使用简单,让自己的demo快速具备升级功能 应用截图 Gradle: 工程的 build.gradle 添加: allprojects { repositories { maven { url 'https://dl.bintray.com/sfsheng0322/maven' } } } ...
使用这个项目,一句代码实现Android应用自身检查更新。 功能特点 使用简单,只需一句代码即可; 不依赖第三方库; 不需要服务端写接口; 界面美观; 效果截图 如何使用 1.首先,添加jitpack仓库支持和gradle依赖: ...
Android Android Android Android 应用现状 � 设备商: lenovo 、琦基、戴尔、三星、摩托罗拉、华为、英特尔、 Kogan 、索爱、华硕、多普达、爱可 视 、 Archos 等。 � 制造商: HTC 、 Telstra 等。 � 手机设计...
android studio下载 该构建系统可以作为集成工具从 Android Studio 菜单运行,也可从命令行独立运行。您可以利用构建系统的功能执行以下操作: ...在导入现有项目时,Android Studio 会自动生成必要的 build 文件。
android studio下载 该构建系统可以作为集成工具从 Android Studio 菜单运行,也可从命令行独立运行。您可以利用构建系统的功能执行以下操作: ...在导入现有项目时,Android Studio 会自动生成必要的 build 文件。
可下载、安装、卸载、升级手机应用。3. 短信管理:新增、删除、编辑、复制、粘贴、导出/导入短信。提供短信聊天模式,短信群发功能。提供会话和列表两种短信浏览模式。独特的"本地短信"设计,让您方便管理手机短信。...
4.3 模块实现 25 4.3.1根据适口属性设计响应式布局: 26 4.3.2同分辨率范围内的流式布局设计 26 4.3.3移动端viewport属性设定 27 4.3.4组件样式的渐进增强设计 27 4.4 本章小结 27 第五章 认我测在线检测服务系统...
7、APK包信息自动获取:每一个应用包里面都包含了包名、版本号、版本Code、系统SDK版本等信息,这些信息关系到版本升级,用户的手机是否适合使用,所以是至关重要的,也是Android Market必备的一项功能。 8、专题...
已弃用-不再积极维护 ...使用版本化的Preferences和方法将数据从一个应用程序版本更新和迁移到下一版本 迁移保存当前数据在SharedPreferences到托盘与 托盘经过100%单元测试! 0皮棉警告/错误 Android 6.0 支持
8)为利于实验的操作性与后期相关技术升级,平台与模块采用非固定式磁性吸合连接方式,不接受螺丝或针脚固定方式 9)平台须经过可靠性验证,平台实验模块槽与教学模块之间采用弹性探针触点方式供电及提供信号传输 ...
Java是一种高性能、跨平台的面向...自动内存管理(垃圾回收): Java具有自动内存管理机制,通过垃圾回收器自动回收不再使用的对象,使得开发者不需要手动管理内存,减轻了程序员的负担,同时也减少了内存泄漏的风险。
移动应用开发技术:利用Android和iOS平台开发手机APP,提供便捷的用户体验。 五、实施步骤 需求调研:深入了解停车场管理需求和用户需求,明确系统建设目标。 系统设计:根据需求调研结果,进行系统架构设计和功能...
WiFi模块作为AP时的应用: 特点: 操作简单:会操作串口就会操控我(提供指令集;我是串口WIFI) 启动时间:6S。(市面上普通WIFI模块启动时间大都多于6S,部分甚至接近30S) 功耗:3.3V供电,170mA-300mA。(功耗偏大,...
Wio Link 是一款基于 ESP...通过云编译和 OTA 自动升级 把现实世界融入虚拟平台。所有的传感器都变成了虚拟 RESTful API Android & iOS 应用程序管理 Wio Link 支持 Seeed 的 IFTTT 附件资料截图,见原文出处下载:
该集成电路可应用于射频自动增益放大器、视频增益控制、A/D转换量程扩展和信号测量系统。 AD603封装引脚图: Android示波器电路原理图 电路城语:此资料为卖家免费分享,不提供技术支持,请大家使用前验证资料的正确性...